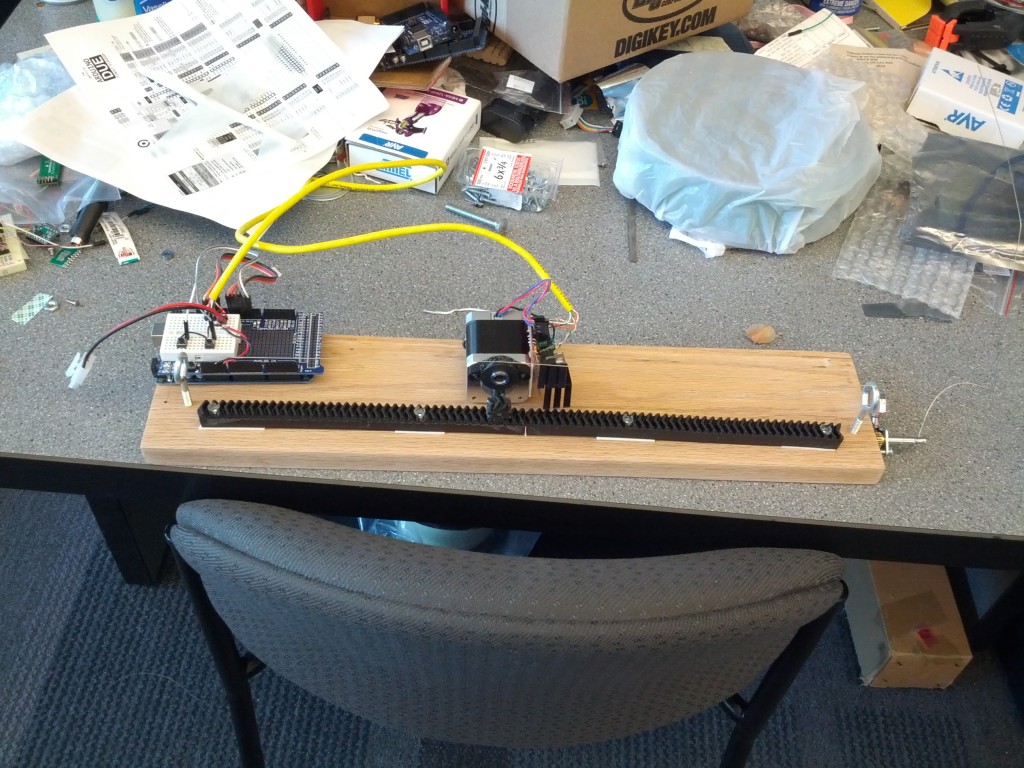
More like version 0.1, every part of it was bad in some way. We did robotic self-tuning monochords—single-string musical instruments—last spring in the mechatronics class. The students did pretty well.
Most of their robots were designed along similar lines: they had a servo with a pick to pluck the string, an electric guitar pickup from which the robot read the string’s frequency, and a stepper motor to spin a machine head to adjust the string’s tension (and thereby change the frequency). The design had some issues that the students didn’t have time to fix before they had to move on to their next projects. We found that the biggest problem was that the tension controls weren’t responsive. The machine heads are made more for precision than speed—with a guitar you have to tune a string precisely, but you shouldn’t have to do it very often so it doesn’t matter if it’s slow. One team adjusted the tension using a linear actuator that stretched the string by moving a bar back and forth, which was a novel idea but which also suffered from unresponsiveness since they necessarily used a lead screw as a linear actuator.
I figure a robot should be inherently precise compared to a human, so machine heads are the wrong tool for the job. We ought to be able to find a speedier way of adjusting the string frequency. Instead of adjusting the tension I wanted to try adjusting the string length like you do with your fingers in most real stringed instruments.
For my first try I printed out a herringbone rack and pinion and screwed it to a board with some countersunk screws. That was the most successful part of the project: the pinion, mounted to a stepper motor, moved smoothly back and forth along the rack in spite of the screws interrupting the rack teeth.
The stepper had two roller bearings functioning as wheels holding it up in back, and it was supported in front by the rack. I printed a wheel to apply pressure to the string (simulating the finger/fret), and a v-shaped support to raise the wheel above the pinion and to centre it. Originally I had the wheel mounted to just one of the motor’s screw holes, but since it was off-centre the pressure from the string pushed the motor on its side. The wheel rolled smoothly along the string, so that was cool too. The string was held by a couple of eye bolts with grooves cut in them to keep the string in place (replacing the guitar’s nut and bridge), and was connected to a machine head for easy tensioning. The stepper was controlled by an Arduino with two buttons to make the motor turn back and forth.
The things that sucked:
- I sanded a groove into the wood platform to keep the wheels straight, but it was too shallow and didn’t do its job
- It was super-hard to get the printed rack straight, and it didn’t line up with the string all the way along the robot
- The robot was way too short and didn’t produce an interesting range of sounds. The rack was like 18″ long, and less than half of that was usable since the string just damps out if it’s too short (like plucking the string that leads from the machine head to the nut on a real guitar)
- The stepper had too much inertia and its centre of mass was too far back. I was hoping that between the herringbone teeth on the rack and pinion, the wheel groove, and the downward force from the string, the motor would move relatively smoothly. Unfortunately it couldn’t move at high speed accurately and stably. At a certain point on the rack it would just twist itself off.
- In order to adjust the pressure of the wheel on the string, I needed to de-string the guitar, screw the eye bolts in or out, and re-string the guitar
- The plastic wheel damped the string a bit compared to a metal fret
I didn’t bother installing a plucking system or a frequency sensor. Instead I started work on version 2, which uses a Makerslide linear bearing and a more traditional belt-and-pully system for moving the carriage back and forth, kind of like in the MechBass video that I linked to above. I like the idea of having the string “fingered” by a wheel instead of fingers à la MechBass, it ought to produce a neat slide-guitar effect and will also make it very easy to add vibrato to a note. Anyway, version 2 is underway and I think it will solve most or all of the problems from version 1 that I listed above. Alas, I didn’t order enough parts and our 3D printer broke, so as of this writing development is paused.
