Author Archives: Neil MacMillan

Finished 3D-printed AUV hull

The hull is done for now.  As I mentioned before, I have some improvements in mind (mainly to get rid of the outer bolts), but it took about 34 hours to print all eight pieces and I’m not eager to do it again.  If I ever get around to putting motors on this thing then I will have to re-print at least four of the semidemihemispheres, as the current ones don’t have any mounting points for motor attachments.

Pictures and video follow:

Continue reading

What I learnt making a 3D printable AUV hull (Part 2)

I printed four copies of the semidemihemisphere and refined it a bit as I went.  Here’s the whole thing, including the hull that I covered in my last log entry.  The only difference in the hull is I removed the top hole, as only two of the semidemihemispheres need it (as valve mounting holes).

Tweaked version of the AUV model.

Tweaked version of the AUV model.

I made a few interesting changes to the cutaway portion though:

Continue reading

What I learnt making a 3D printable AUV hull (Part 1)

I did a bit of testing on my AUV hull design, and finally got a prototype ready to go.  I’ve been working on the design for several months in Autodesk 123d, which is a pretty great program if you can put up with the crashes, corrupt save files, and slowness (hey, it’s beta).

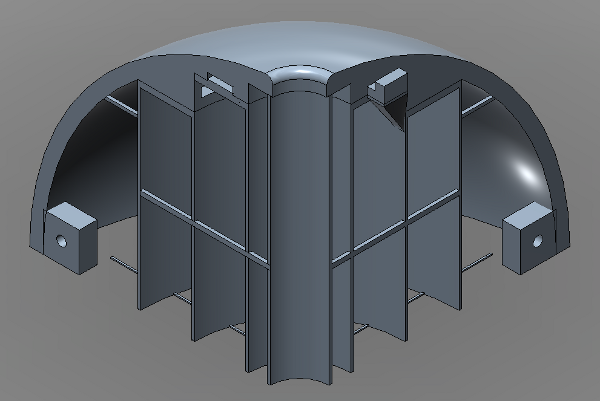
Here is my current design in full, including the support structures:
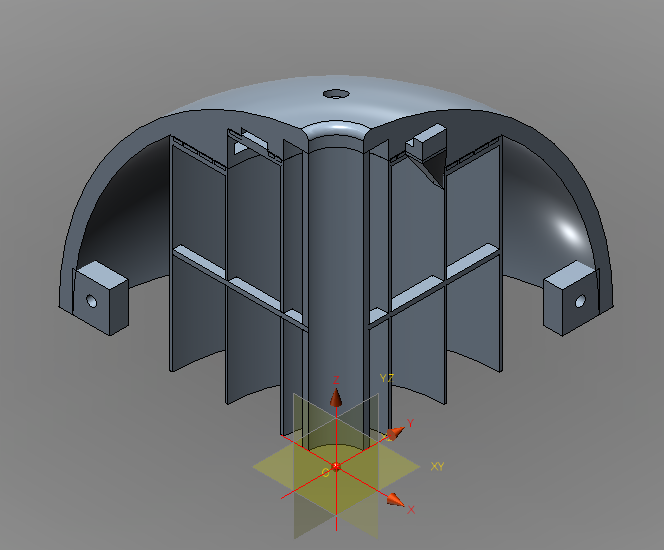
Spherical Autonomous Underwater Vehicle hull

The 3D model for my spherical AUV hull.

This is one eighth of the hull; I call it a semidemihemisphere.  Eight of these will make a sphere 18 cm in diameter.  I split it up into eighths because I’m using a Makerbot 3D printer and its build platform is limited to a cube about 10 cm to a side.  Also, this way each piece can be identical (or nearly so).

One limitation in the Makerbot is that it can’t print overhangs very well, so I had to add some support structures that can be cut away.  In this entry I will ignore that and focus on the hull design:

Continue reading

Poor man’s IrDA for intermodular communication

If all goes extraordinarily well, the AUV will have the following modules sitting in the hull:

  • Acoustic modem
  • Motor control
  • Depth control (buoyancy control and pressure sensing)
  • Master controller

Rather than wiring everything together, I plan to give each module its own power supply and use an optical communication protocol to connect the modules to the master controller.  The inside of the hull will be cleaner and more solid than if everything was wired together, and waterproofing will be easier.  Here’s how it works:

Continue reading

Sure enough, ReplicatorG reads 123D-generated STL files at 1/10 scale

Update: 123D beta 5 uses the proper units for exporting STL files, so the scaling operation is no longer necessary.

As I noted previously, objects in STL files created by Autodesk’s new 123D CAD program are not correctly scaled when loaded into ReplicatorG (at least not for me, I’m using the public beta from a few weeks ago).  Eyeballing it, I guessed the object in RepG was about 1/10 the size defined in the 123D model.

To test this hypothesis, I designed a rectangular prism, 50 mm by 25 mm by 10 mm (yes, the temptation to go 90x40x10 was strong).  Results follow:

Continue reading

Forget the title of that last post: developing an AUV hull in 123D

I’m working on a prototype for the AUV hull.  I plan to print a 10 cm diameter hollowish sphere and use it to develop a buoyancy system.

It’s not easy to print a large sphere on a Makerbot.  There are a lot of cool sphere things on Thingiverse, including some pretty sweet hollow sphere patterns.  That hollow sphere is allegedly printable on a Makerbot, but I’m not sure it’s the best option for my AUV.

I’m working on a design for a self-supporting hemisphere in Autodesk’s new 123D CAD program.

Continue reading

AUV Motor: Solved

Okay, that’s a little premature.  Still, these guys at OpenROV had the brilliant idea of using a bilge pump motor to propel their ROV and it looks like it’ll work really well.

I bought a $25 Johnson Pump 500 gallon per hour cartridge bilge pump at Canadian Tire.  The casing pops right off, leaving a nice little waterproof 12 V DC motor with a 3 mm shaft.  I attached a propeller blade and tried running it underwater:

It worked pretty well.  It draws 2.3 A at 3.5 V.  I’ll use a smaller propeller when I find one, which should reduce the power consumption and output.

One strange thing is that the pump has a greased seal between the pump chamber and the top.  Are they trying to waterproof the top for some reason?  Is it just to keep the water in the chamber so that it doesn’t lose pressure?  The label says the pump is submersible, so hopefully it actually is.  I haven’t worked up the nerve to submerge the whole thing, and I might just seal it up with some potting compound before trying.

I have a feeling I will appropriate a lot of ideas from OpenROV over the next year.

Lots of Neat Options for an Acoustic Transducer

I mentioned the US40KT-01 transducer pair from Meas Spec before, but it’s an air sensor.  One could cover it with a potting compound to waterproof it.  My source suggested 3M Scotchcast 2130, which is intended for electrical insulation but apparently has some desirable acoustic properties (viz being close to the acoustic impedance of water).  He cites Acoustic and dynamic mechanical properties of a polyurethane rubber [PDF] by Mott, Roland, and Corsaro as a good resource on this stuff, but I haven’t read it yet.

I also came across some really cheap waterproof transducers that may be suitable.  Unfortunately they both have high directivity, whereas I’d like at least an omnidirectional transmitter.  Another possible issue is that they’re made for outdoor applications, not underwater applications.  How waterproof is “waterproof”?

This guy has a super-cool post on driving the little waterproof transducers.  Instead of using a step-up transformer, he uses an inductor and a MOSFET.  The inductor gets charged from a 9 V battery through the MOSFET.  When the MOSFET is opened the magnetic field collapses and it sends about 300 mA of current through a diode to power the transmitter.  This is called the inductive flyback method.  Awesome!

One final note: I found what look like the transducers that are on the ranger modules I’m using.  Less than US$3 per pair.